Authentication and Authorization
In order to perform Authentication in Magpie, multiple Provider and methods are supported.
By default, the Internal Provider named ziggurat is employed, which corresponds
to the package used internally to manage all Magpie elements.
Login procedure is covered in Authentication Requests section.
Supported External Providers are presented in the table below in section Authentication Providers, although more could be added later on.
Warning
Terms Authentication Provider, External Providers and External Providers in this
chapter must not be confused with providers employed in File: providers.cfg. In this chapter, providers
refer to user-identity resolvers, in contrast to Service definitions from the configuration files.
All Authentication request can be accomplished in order to login using existing User accounts.
To create new accounts, either another User with MAGPIE_ANONYMOUS_GROUP membership must create it,
or using the User Registration operation when enabled.
Authentication Requests
The most convenient way to sign-in with Magpie is to employ the user interface provided on path
{MAGPIE_URL}/ui/login. This page will present fields that allow both Internal Providers
and External Providers login methods.
Alternatively, API requests can be employed to define your own interface, or to obtain request tokens needed to accomplish further requests interactions toward Magpie or obtain Authorization from the Proxy using Magpie to enforce policies.
Following are the supported request formats.
Request Method
Both GET and POST are supported. This is in order to allow resolution of credentials for some
applications that do not correctly handle or purposely prohibit use of POST method. Also, GET helps quickly
accomplishing a login from a web browser using the {MAGPIE_URL}/signin endpoint with query parameters
(see Query Parameters).
Note
Whenever possible, prefer POST request with Body Content or the UI endpoint.
See also warning in Query Parameters for details.
For each of the following request variants, the user_name field can refer to either the literal name representing
the User, or its email employed during registration. The submitted value will be tested against both to
retrieve a potential matches to accomplish Authentication.
Query Parameters
This method employs the query string parameters in the URL to provide the credentials. The format is as follows.
GET /signin?user_name=<usr>&password=<pwd> HTTP/1.1
Host: {MAGPIE_URL}
The response will contain Authentication Headers detail needed for user identification.
Warning
Whenever possible, it is strongly recommended to instead use another one of the methods which offers
better support for different Content-Type responses to interact with Magpie as an API.
Furthermore, using the POST method with content body and/or headers reduces risks of credential leaks that
would be visible in plain text via query parameters using GET request. Most servers and applications log path
and query parameters profusely, or even caches them, which can lead to easier identity theft or hacking of servers.
The GET method remains available for backward compatibility and quick testing purposes only.
Body Content
Body content requests allow multiple variants, based on the specified Content-Type header.
All variants employ a similar structure, but indicate the format of the body to be parsed.
By default, application/json is employed if none was specified.
POST /signin HTTP/1.1
Host: {MAGPIE_URL}
Content-Type: multipart/form-data; boundary=<boundary-string>

--<boundary-string>
user_name: "<usr>"
password: "<pwd>"
provider_name: "<provider>"     # optional
--<boundary-string>--
POST /signin HTTP/1.1
Host: {MAGPIE_URL}
Content-Type: application/x-www-form-urlencoded

user_name=<usr>&password=<pwd>&provider_name=<provider>
POST /signin HTTP/1.1
Host: {MAGPIE_URL}
Content-Type: application/json

{
    "user_name": "<usr>",
    "password": "<pwd>",
    "provider_name": "<provider>"
}
The response will contain Authentication Headers detail needed for user identification.
Authentication Providers
For any of the Authentication requests, omitting the provider_name identifier
(or explicitly using value of MAGPIE_DEFAULT_PROVIDER) will default to employ the Internal Providers
method. This means that User identity resolution will be attempted against locally registered users in Magpie
database.
To instead use one of the External Providers, the corresponding provider identifier must be provided within
the sign-in request contents with provider_name. The value of that field must be one of the available provider in
the below table.
Each provider has different configuration parameters as defined in Magpie Security module and use various protocols
amongst OpenID, ESGF-flavored OpenID and OAuth2. Further External Providers can be defined
using this module’s dictionary configuration style following parameter specification of Authomatic package used for
managing this Authentication procedure.
Category |
Provider |
|---|---|
Open Identity ( |
|
Earth System Grid Federation (ESGF) (1) |
German Climate Computing Centre (DKRZ) |
French Research Institute for Environment Science (IPSL) |
|
British Centre for Environmental Data Analysis (CEDA) (2) |
|
US Lawrence Livermore National Laboratory (LLNL) (3) |
|
Swedish Meteorological and Hydrological Institute (SMHI) |
|
|
GitHub Authentication (see GitHub Settings) |
WSO2 Open Source Identity Server (see WSO2 Settings) |
OpenIDNote
Please note that due to the constantly changing nature of multiple of these external providers (APIs and moved Websites), rarely used authentication bridges by the developers could break without prior notice. If this is the case and you use one of the broken connectors, summit a new issue.
Using any of the External Providers will tell Magpie to interrogate the configured identity URL of that
provider and use the credentials to attempt Authentication. If successful, the response returned by that
Provider should be parsed by Magpie in order to determine which corresponding local User profile
it refers to. After validation, the Logged User will be authenticated and following requests will be
applicable using the same Cookie methodology as when using normal local provider procedure.
See Authentication Headers for more details on that matter.
Authentication Headers
Added in version 3.9: The WWW-Authentication and Location-When-Unauthenticated headers are returned whenever the
HTTP Unauthorized [401] response is the result of a request. This is done in order to help requesting
users or applications identify the endpoint where it can attempt Authentication with credentials.
After execution of an Authentication request, a Set-Cookie header with Magpie user identification token
named according to Security Settings should be set in the response as follows.
Set-Cookie: {MAGPIE_COOKIE_NAME}=<auth-token>!userid_type:int;
            [Domain=<domain>; Path=<path>; HttpOnly; SameSite=Lax; Max-Age=<seconds>; expires=<datetime>]
Web browsers and libraries for HTTP requests handling should automatically detect that header and register the defined
Cookie for subsequent requests. Alternatively, that Cookie can be provided directly in the request using the
same format.
All additional parameters (in brackets above) are optional and can be provided to explain how control of the scope the
Magpie cookie applies to, notably to avoid conflicts with other potential cookies employed by the request. The only
mandatory parts are the MAGPIE_COOKIE_NAME value, the actual token value, and the indication of represented
content with !userid_type:int to let Magpie known the provided token information is employed to resolve the
Logged User by ID.
Note that any Cookie generated by Magpie can have a maximum valid duration, identified by the both the returned
Max-Age in seconds and the expires value as explicit date and time. Generated cookies are defined in such a way
that they will automatically emit a new Cookie based on reissue time after 1/10th of the Max-Age to update the
Cookie over continuous sessions. Any Logged User will therefore remain logged in if further requests are
accomplished using the same Cookie within the lifetime duration of the original login, unless explicitly logged out.
Modifications of the duration is accomplished using configuration detailed in Security Settings.
Changed in version 3.9: Although maximum duration could be defined in settings, prior versions did not explicitly indicate them in the
generated Cookie. Following versions without these values will effectively mean the Cookie has unlimited
lifetime.
As for most of the other API request endpoints offered by Magpie, the Accept header can be provided to select the
format of the desired returned content. Following valid Authentication, the body should contain a basic message
indicating as such, and returning OK [200] status. Otherwise, the appropriate HTTP error code will be returned with
a description message of the error cause. By default, header definition Accept: */* or completely omitted value for
Accept will employ application/json for the returned Content-Type.
User Registration
Added in version 3.13.
Warning
Please refer to the Security Notice under MAGPIE_USER_REGISTRATION_ENABLED regarding the impact
of this change.
Using this feature, new User accounts can be created by anyone (self-registration) instead of previously needed
administrative access to create them. The new accounts will require an unique user_name and valid email in order
to confirm and complete registration. The provided email is employed to send a notification and validation endpoint
of the specified registration information.
This operation must be enabled in the corresponding Magpie instance using MAGPIE_USER_REGISTRATION_ENABLED
definition in User Registration and Approval Settings settings for this feature to be available. Otherwise, the only
method to create new User entries will remain through membership to MAGPIE_ADMIN_GROUP
(see also Route Access). Administrators can always employ this direct User creation mean regardless
of the enabled state of this feature.
Procedure
Following is the summarized notification workflow to complete registration.
User Registration Procedure
The procedure always start at reception of a new user account as requested from the Magpie UI frontpage (see the
Registerbutton to retrieve the submission form), or through the corresponding API request. Minimal validations of submitted fields and to avoid conflicts with existing User is accomplished before moving on to the next step.Upon reception of a valid new registration, an email will be sent to the submitted email such that the Pending User can validate its address with the provided confirmation link. This step is always required.
Once the validation is received, there are two possible outcomes according to configured value of
MAGPIE_USER_REGISTRATION_APPROVAL_ENABLED.When
MAGPIE_USER_REGISTRATION_APPROVAL_ENABLEDis NOT activated, only email validation is required from the confirmation email. When visiting the confirmation link inside the sent email, the emitted request received by Magpie will in that case immediately complete that User registration process. The procedure moves directly to step (5) skipping (4).If
MAGPIE_USER_REGISTRATION_APPROVAL_ENABLEDwas instead activated, approval must first occur. This will be possible as reception of the validated email from the Pending User will trigger another notification email towardMAGPIE_USER_REGISTRATION_APPROVAL_EMAIL_RECIPIENT. That email should then be employed to approve or decline the subscription request with corresponding temporary token links.
(Only if 3B) This step is the administrator review of the Pending User registration request. When an administrator approves the Pending User account, the procedure resumes normally with step (5). Otherwise, the account remains in pending state until invalidated. Invalidation occurs if the administrator declines the request or explicitly deletes the Pending User using the corresponding API or UI methods.
An email is sent back to the original submitter to notify them that their account is validated and ready to be employed. The now created User will be able to login using the available Authentication Requests methods.
(Optional) When
MAGPIE_USER_REGISTRATION_NOTIFY_ENABLEDwas activated, an additional notification email is sent toMAGPIE_USER_REGISTRATION_NOTIFY_EMAIL_RECIPIENTto inform of the account that was validated and the generated User from completed registration. This email can be the same as the approving administrator email, or a completely different authority, whichever is desired to be notified of completed new User accounts.
Note
Once a Pending User is validated with the above procedure, the completed User account will trigger any registered Webhook in the same manner as if the User was directly created by the administrator.
Following figure represents the described above behaviour of the registration steps according to enabled alternatives.
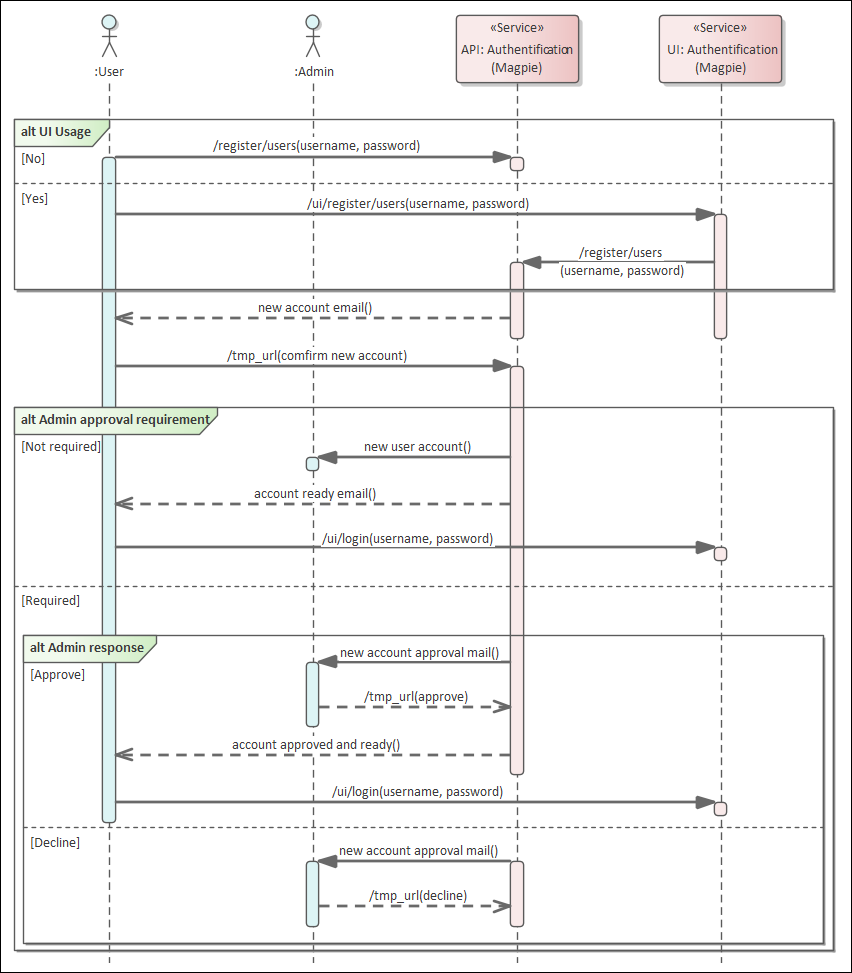
User Registration Procedure demonstrating communication steps for each operation and alternatives. (Version 2.0, updated 2021-06-02)
Management
All Pending User details can be queried and managed only by administrator-level User, using the
relevant API /register/users endpoint, or the query string status on normal API /users endpoint. Note that
user registration endpoints will return an HTTP Not Found [404] error if MAGPIE_USER_REGISTRATION_ENABLED
was not set accordingly, which will disable the complete self-registration procedure.
The Pending User is a special kind of user that is treated differently than typical User since their
account validation is incomplete, and will therefore not be returned by normal API and UI endpoints. Only explicit
queries (e.g.: status=pending) or specialized requests endpoints will return those entries.
Regarding relationships with other Magpie concepts, such as Service, Resource, Group or Permission definitions, those Pending User will not be available and cannot be associated until registration was processed completely. When account validation and approval is completed, the Pending User is upgraded to a full fledged User, with all applicable operations on it. The User account will then operate normally as any other existing ones. That User will also be able to proceed with typical Authentication Requests procedures to login with Magpie.
Any Pending User registration will be listed and accessible from the Magpie UI administration management area. Therefore, if a validation email gets lost or is not processed by the relevant administrators, pending registrations can still be obtained and processed by visiting the User list page.
Customization
All notification emails sent by Magpie can be customized to match your specific requirements or format using Mako Template files. Custom email contents should contain all relevant details defined in their corresponding default templates to ensure that basic functionalities of the user registration and administrator approval procedure can be accomplished as intended. The logic of the message content is left at the discretion of the developer if customized.
Furthermore, as described in the procedure, MAGPIE_USER_REGISTRATION_APPROVAL_ENABLED can be used to
specify whether administrator approval is required or not. This additional step is purely up to the developers and
server managers that use Magpie to decide if they desire more control over which individuals can join and access
their services.
Network Mode
If the MAGPIE_NETWORK_ENABLED is True, Magpie instances can be linked in a network which allows them to
associate User` accounts across the network and provide limited Resource access to users who have
accounts on other Magpie instances in the network. Each Magpie instance is considered a Network Node
in the network.
Users who have an account on one Magpie instance can request an access token from another instance in the network which the user can use to access resources protected by the other Magpie instance.
Users with accounts on multiple instances in the network can also choose to link their accounts. This allows users who use access tokens to ensure that they have the same access to resources that they would have if they logged in to Magpie using any other method.
Managing the Network
Each Magpie instance must be made aware of the existence of the other instances in the network so that they know where to send token requests and account linking requests.
In order to register another Magpie instance as part of the same network, an admin user can create a
Network Node with a request to POST /network/nodes. The parameters given to that request includes
name:the name of that other Magpie instance in the network and should correspond to the same value as the
MAGPIE_NETWORK_INSTANCE_NAMEvalue set by the other Magpie instance.
base_url:Base URL of the instance. This is mostly used for display purposes.
For example:
https://nodea.example.com.
jwks_url:URL that provides the instance’s public key in the form of a JSON Web Key Set.
This is usually
https://{hostname}/network/jwkswhere{hostname}is the hostname of the other instance
authorization_urlURL that provides the instance’s Oauth authorize endpoint.
This is usually
https://{hostname}/ui/network/authorizewhere{hostname}is the hostname of the other instance.
token_urlURL that provides the instances Oauth token endpoint.
This is usually
https://{hostname}/network/tokenwhere{hostname}is the hostname of the other instance.
redirect_urisJSON array of valid redirect URIs for the instance. These are used by the instance’s Oauth authorize endpoint to safely redirect the user back once they have authorized Magpie to link their accounts on two different instances.
This is usually
https://{hostname}/network/linkwhere{hostname}is the hostname of the other instance.
Once a Network Node is registered, Magpie can treat the other instance as if they are in the same network as long as:
Both instances have
MAGPIE_NETWORK_ENABLEDenabledBoth instances have
MAGPIE_NETWORK_INSTANCE_NAMEsetBoth instances have
MAGPIE_NETWORK_PEM_FILESset in order to verify communication between nodes using an asymmetric public/private key-pair.
Managing Personal Access Tokens
A User can request a new access Network Token from another Network Node with a request to the
GET /network/nodes/{node_name}/token route.
Every time a User makes a request to this route, Magpie send a request to the other instance, and provides it to the user. A new token is generated every time. This effectively cancels all previously created tokens for that user.
To cancel an existing token without generating a new one. A User can make a request to the
DELETE /network/nodes/{node_name}/token route.
Authentication
Once a User gets an access Network Token, they can use that token to authenticate with the Network Node instance that issued that token.
When a user makes a request, they should set the provider_name parameter to the value of
MAGPIE_NETWORK_PROVIDER and provide the network token in the Authorization header in the following format:
Authorization: Bearer <network_token>
When using the Magpie Adapter, the token can also be passed as a parameter to the request,
where the parameter name set by MAGPIE_NETWORK_TOKEN_NAME and the value is the personal Network Token.
Authentication Flows
The following diagrams describe in detail the request flows that are involved when Magpie instances operate in a network.
In all the following diagrams, Nodes A and B are assumed to be Magpie instances that are part of a linked network. The Client is a person who has an account on one or both of the Magpie instances in the network. If a diagram shows the Client making a request directly to one of the Nodes, it is assumed that the Client is authenticated on that Network Node and authorized to make the request.
Client Request Flow
Whenever two Magpie instances in a network send any request between each other they will use the following request flow. Each request will be sent with a JSON Web Token (JWT) that is signed with the sender’s private key, the receiver can then verify that the token came from the sender using the sender’s public key.
Each instance has stored a jwks_url for every other instance in the network. This is where each instance’s public
key can be found. Note that jwks_url is not provided as part of the request.
Network Token Request Flow
The following describes how a client can request a Network Token for Node B assuming that they have an account and are logged in to Node A.
Note that the result of this flow will not actually create a new User for the client on Node B but will create a new Network User (if it doesn’t already exist) that is associated with a User on Node B.
Network Token Delete Flow
The following describes how a client can delete a Network Token for Node B assuming that they have an account and are logged in to Node A.
This flow is almost identical to the Network Token Request Flow.
Account Link Flow
The following describes how a client can link their account on Node B with their account on Node A.